Chain Maintenance
There are a few topics that are guaranteed to turn into religious wars when it comes to motorbikes - which oil to use, what tyres are the best and the latest one I've discovered: How to maintain your chain drive. Some people swear by doing no lubing at all, just keep it clean and tensioned correctly. Others say use nothing but WD40 for both cleaning and lubing and it will last 30,000km. There are videos on how to clean your chain, which products to use, which lube is the best, and everyone has their opinions on the right way to do it.
I haven't had to worry about it for years - my last bike was a belt drive and the one before that was shaft drive so I haven't cleaned and lubed a chain in nearly a decade. But with the purchase of my new bike I'm back to chain so now it's something I've become slightly obsessed with. You see, for the first 2,000km or so I simply gave it a clean every 1,000km and lubed it every tankful of gas, but I found that while the chain was easy enough to clean it was getting a black oily coating on the inside by 1,000km, and when I removed the front sprocket cover there was a sludgy, tacky mess inside. This probably means I was applying too much lube and it was flinging off as it rounded the front sprocket, but even when I only applied a small amount and then wiped it down it was still flinging off.
And so I went down the rabbit hole of chain maintenance, reading up on products to use, watching YouTube comparisons and I've settled on a formula that works for me and is really very cheap: I use kerosene to clean the chain and gear oil to lube it. Strangely enough I don't seem to get the same fling off when using oil as I did when using lube, though this is more likely due to me being more conservative with the oil application rather than simply spraying on lube. There are some definite upsides to using gear oil as a chain lube, including:
- Oil fling off is super easy to wipe off with a cloth - no more tacky mess inside the front sprocket cover.
- It's very cheap - a one litre bottle is cheaper than a can of lube will last a long time (many thousands of km).
- It is a very good lubricant and dirt doesn't seem to stick to it as much.
- It is very unobtrusive when applied - this is a personal thing I admit but I don't like how a lot of lubes go on yellow or cloudy. Gear oil simply leaves a light oily coating all over the chain. It's really clean and makes the chain look brand new
- Cleaning the chain is really quick and easy compared to lube - spray it down with kerosene or chain cleaner and a quick brush and wipe later it looks like new, no more removing the tacky mess.
- It takes a lot longer to lube the chain - you can't simply spin the wheel while spraying, you have to drip some oil onto a paint brush and brush it on in sections (at least that's the easiest way I've found to do it).
- You have to lube it a bit more often as it doesn't cling as well as chain lube (makes it easier to clean but doesn't last as long).
- Not sure if it's needed or not but I tend to re-apply after riding in really rainy weather
Fork Oil Change!
Well I finally got around to changing the fork oil on the Buell. This is meant to be done every ~16,000km but in the close to ~30,000 km I've had the bike I've never done it, I kept putting it off due to thinking it would be very difficult. But after seeing Dave Moss at the recent Shiny Side Up talk series in Auckland talking about oil changes I watched his Dump & Run fork oil change method and realised that the hardest part of this whole procedure would be removing the forks from the bike - there is no need to actually dive into the internals of the fork at all!
So armed with my floor jack and a couple if spanners I decided to give this method a crack. It ended up taking me just over three hours, though I realised later I took more of the front apart than I needed to, and also faffed around putting it back together, so I'm sure when I next have to do this I'll probably be at least 30 minutes quicker. To start, loosen off all preload, rebound and compression adjusters (making a note if you have to of how many turns were needed). Once that's done, loosen off the top fork clamps and crack open the fork tops with a deep socket or ring spanner. Don't take the caps all the way off, just a few turns should be enough. Once that's done, loosen the front axle pinch bolts and undo the front axle a few turns, then crack the lower fork clamps. Finally, remove the front fender by undoing the T27 Torx bolts holding that in place. Once everything is loosened jack the front of the bike up using the exhaust, remove the front axle and wheel (I had to also faff with the brake caliper to get the wheel out easily) and loosen off the fork clamps the rest of the way. At this point you should be able to slide the fork down through the fork clamps until you can see the snap ring near the top of the forks - remove this to clear the lower fork legs and pull out the forks.
That's the hard part over - now it's just a matter of cleaning up the fork lowers as these will most likely be dusty and covered in crap - I found WD-40 sprayed on a rag got this dust and dirt off without too much hassle. Once that's cleaned up grab a measuring jug that can hold over 500ml/32oz and place this on your work bench ready for pouring, and you can now remove the top cap and slide the outer down slightly, exposing the gap to pour the oil out of. Pour the used oil into the measuring jug, then re-attach the top cap, pump the fork a few times (you'll have to push your weight into it) against some old carpet or thick cardboard lying on the ground, and repeat the pouring process. You'll have to do this a few times - basically keep pumping and dumping until nothing more dribbles out. I ended up getting about 550ml per leg out of my forks in the end - it's impossible to get it all out without stripping the forks down and cleaning everything, but using this method you should be able to get 90~95% of the oil out, and if that's good enough for Dave Moss then that's good enough for me! After that it's just a case of measuring out the same amount of fresh oil as you poured out of the fork and carefully pouring it into the fork - once that's done it's time to put the front end back together in the reverse of how you took it apart. Make sure you follow the manual for correct torque of all bolts and the top cap - and make sure you torque the fork caps before torquing the upper fork clamps. Don't forget to set your damping, rebound and compression back to what they should be (if you can't remember, consult the owners handbook, it has all the settings for different weights).
So after all that I can't say I notice any difference in the front end, but I'd like to think I would on a fast road ride, or a really bumpy stretch of gravel road. Judging purely by the state of the oil that came out I'm sure this hadn't been done in some time (it really looked like old coffee), so I'm glad I finally got around to this, and now I know how easy the whole process is I'll not wait so long next time before doing it again.
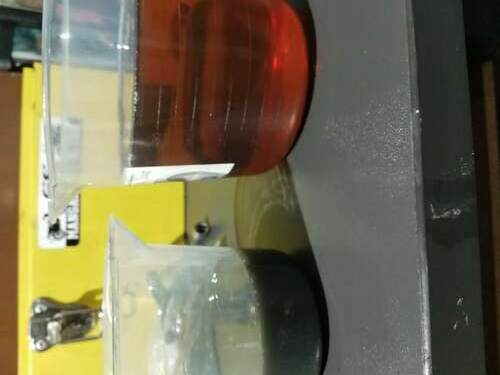
Old on the left compared to fresh oil on the right. It really wasn't that hard to do, and doing it yourself you can save a few hundred dollars in labour, so now while we're all stuck at home due to Covid-19 order yourself some fork oil online and have a go! If words aren't your thing then watch the Dave Moss video linked above - it is really a simple procedure and you'll gain some knowledge and satisfaction out of doing it yourself!
About
![]() This is a space for me to write about motorcycles and related topics. The name "Honu" comes from the Maori word
"Tortoise" so I thought it was a fitting name for a blog about riding, sometimes long distances! I'm a 40 something
year old Kiwi who loves to ride, especially multi day trips off the beaten path.
This is a space for me to write about motorcycles and related topics. The name "Honu" comes from the Maori word
"Tortoise" so I thought it was a fitting name for a blog about riding, sometimes long distances! I'm a 40 something
year old Kiwi who loves to ride, especially multi day trips off the beaten path.